Sunday, October 13, 2013

If you're happy and you know it, Clapham's your Wax!

Ok, I feel like this blog post is out of a scene from No Country For Old Men, when the movie is going along at a reasonable pace and then suddenly the Coen brothers speed up the plot and basically skip the scene that should really be the climax of the movie!  (By the way I like all of the Coen brothers films).  If you don't know the reference, I guess what I'm trying to say is that I finished the island and only have this single blog entry to explain what really should be a few entries.

Wanting to get the island done, I stayed up until 2 AM last night working away on it while the kids slept.  I only had a few cuts to make on the saw, and a bit of sanding so I was able to pull that off without waking them.

So I started the day cutting a shallow saw kerf on the inside of the apron pieces which is used to hold the top to the table with metal clips.  I also pre-drilled and counter bored holes in the stretchers for mounting the lower shelf with lag bolts.

Then I assembled the bottom stretchers to the legs.  Just glued the stretchers into the slots in the legs, nothing more.  One odd thing was that the stretchers seemed to fit more easily than a when they were first cut, either the stretchers shrank or the leg slots opened a bit, maybe both.  Surprised me because I had assumed the wood would have been pretty dry - go figure.  As Tom Fidgeon says "Wood moves, get over it".  Here is a pic of the stretchers glued and clamped to the legs. 


I then assembled the aprons to the legs with the pocket screws.  Just like shooting fish in a barrel!  Actually, it turned out to be a little tricky as nothing was very square, one of the aprons was warped and it was a tricky one man job.  But with a lot of clamps and some special made jigs it worked out pretty good.  After this I clamped the lower shelf in place, marked it, cut it to length on the table saw and pre-drilled holes.  I then sanded the bottom shelf with my ROS with 120 grit, pre-finished it (more on that later) and fastened it down with lag bolts to the stretchers which made the base become rock solid. 


Next step was to cut the top to length which couldn't be done on the table saw as it was too heavy.  So I used my circular saw and a shop-made guide which worked great.  The clamp in the picture is holding a backing board to avoid tear-out of the cut upon exit.  


I worried a lot about the sanding portion of this project while I was milling and gluing up the panels  I was worried that sanding would ruin the reclaimed look of the wood.  Turns out it was a non-issue as I was surprised by how much sanding the wood could take without any negative effect on the character.  I guess the wood is so rough and beat-up that it would take days of sanding to clean it up.  So 120, followed by 180 grit, really just a few light passes was all it took.

So, onto one of the most difficult parts of any project, selecting the finish.  An easy way to quickly ruin any project. If you remember, the Restoration Hardware island is sold without any finish, so ideally the finish I choose would be minimal.  Also, I wanted the finish to be:

1.  Fast drying as I didn't have a lot of time to wait around between coats.
2.  Realtively fume free as I would be doing this in the basement right below the kids rooms.
3.  "In the wood", not a plastic-y film finish you can get with poly if you are not careful.
4.  Non-toxic when cured - not a big deal because this is true of most finishes (it's the solvent that evaporates away that is the bad stuff.)

So, I had come to the conclusion that shellac, might be the best way to go.  Really fast to dry, non-toxic (you can eat the stuff) and non-fumy.  Only issue is that is does form a film (if you let it build) and I'm not sure how good it would be for water-resistance.  

Then it then dawned on me, that a good option might be to use the same beeswax product that I use on cutting boards that I make, Clapham's Beeswax Salad Bowl Finish.  This stuff is great, you just rub it on with a cloth, wait a bit and buff it.  That's it.  Its ready for use right away so not waiting around.  Smells great and you can eat it too.  The only down side is that it is not the best water protection (although its still pretty good), and it likely will need to be replenished from time to time.  I don't think this will be a big deal as its so easy to apply, I can replenish it right in the kitchen in 5 mins or less. 

The other huge advantage is that it sped up my overall project time dramatically as it took about an hour (maybe a little more) to put a coat on, and that's it - done!


So, what does the wax look like?  Amazing.  Love it and my wife said it smells like Christmas.  Here is the finished island in it's final location, seems like a long way from Kentucky!


Not a bad alternative to Restoration Hardware if I do say so myself!  We'll see how the beeswax holds up to eating, spills, cleaning etc.  I'll do a follow up post in a few months and report back.


Monday, October 7, 2013

They say someone paved a road once with good intentions...

If you recall my last post, you may remember that I was trying to figure out whether to create the apron joinery with dowels or mortise/tenon and decided to go with the later.  This was to try to develop my skills as a woodworker and to honor the true craft and time-tested traditions - not to mention that this type of joinery would last centuries.  The problem with this approach it that it doesn't (or perhaps shouldn't) apply to those of us with young families.  In reality, my wife and I have very little spare time and a long list of projects, errands and daily tasks to attend to.  It is a rare thing if I get more than an hour or so in the shop at any given time. It just so happened that this occurred this past Sunday.  My wife and I are getting eager to have this island in our kitchen and eager for me to move on to the next project - the mantle in the living room (or is it rebuilding the back deck, or painting the veranda railing, or painting the radiators, or .....  you get the idea).  So long story short, a friend came over with her two kids and there was a 4 hour play date from which I was excused to attend to issues in the shop. 

It dawned on me just how precious those 4 hours were, and how mortise and tenon joinery although the most solid option, would likely burn the entire day.  It also became apparent that this island is not a piece of fine furniture and that no one beyond a few of my friends who woodwork actually know or care about mortise and tenon joinery.  So.... I decided in the end that I would go with pocket-hole screw joinery for the apron (I know... I know... I didn't say I was proud of it).  I have the Kreg jig, and it works great.  I was just a little nervous if it would be strong enough for 1.75" thick material.  I did a little test with scrap wood and 2.5 inch screws - the result was ok, not great.  Then I moved up to 3" screws and completed the test with glue.  Once the glue dried - rock solid, certainly good enough for the aprons.  For those who don't know, pocket hole joinery is fast and pretty straight forward so it is a great choice as a time savor.  Phew... my conscious is clear.

So before I got to the apron joinery, I began with cutting the legs to size, cutting the apron pieces to size  (without any need to extend the length for tenons as I was using pocket hole screws), and I glued up the table top.  I decided to do the tabletop glue-up in stages as I felt gluing those 5 heavy boards at once by myself was a recipe for disaster.  I glued up boards 1 and 2, then boards 4 and 5, and then these two assemblies were glued to board 3 to make the top.

For those who recall my experience gluing up the legs for my slab coffee table, where I was burned by having the glue start to set before I finished clamping, I have learned to always do a complete dry run of the clamping process before introducing the glue.  Even for a seemingly simple panel glue-up, it is so valuable to do this as you find many errors and work out clamp sizes and the order of operations before it is too late.  Here is a pic of the last tabletop glue-up just prior to and then fully clamped.  I used Tite Bond III, which is FDA approved for food contact and good for wet applications.  It also dries brown so it is a great choice for this application.  (By the way, I forgot to tape the joints for squeeze out like I did for the legs, but in the end I think it wasn't necessary).


I then got on to drilling the pockets in the apron pieces (so easy and fast with the Kreg jig, but you can't help but feel a little guilty....) and then I cut the stretchers and the 3" wide slots in the legs into which the stretchers will fit.  It was my first time using a dado stack which I purchased through a friend at work, and I must say it made the process much faster (although you do have to be wary of the increased thickness of the blade as I almost made one of the slots too wide).  I can't imagine how long it would have taken me to cut the slots if I were to nibble away at them with a single blade.  There is also a bit of a recess/cut-out in the stretchers into which the bottom shelf sits - I cut this out on the bandsaw.

So with the parts all cut and the panels glued up I did a loose assembly to see what this thing will look like.


Not bad.  I don't think the stool is going to work though, I'd actually like to find a couple of old round metal stools - there is a large antique store not far from me so I'll go hunting at some point.  The overhang on the right is intentional as we plan to have the kids eat meals here, so wanted a little overhang.  That said, I'm not sure I like the look of it, so I may decide to just center the top.  I'll need to try it out with the kids actually sitting at the island first before I decide.

The last thing I did before I had to get upstairs, was to start sanding the legs and aprons.  I went pretty light with 120 grits on my ROS.  I think its going to look good, it gave a good balance between softening the edges and retaining the reclaimed character.  I'm anxious to see how the top will look with some sanding. 

Next steps are to cut the top and shelf to size with a circular saw (while trying to avoid tear-out), cut a kerf in the aprons to receive the metal clips which will hold the top and sand the top and shelf.  Then the question is, do I assemble first or pre-finish, and also what am I going to use for finish?  Waterlox, General Finish?  hmmmm.... 


Thursday, October 3, 2013

Nice Legs.

So it was time to start cutting and dressing these bad boys.  I was anxious to see what the stock would look like with some fresh cuts.  I basically rough cut the leg stock to length, and jointed one face.  I was really impressed by what I found beneath the surface!  This was definitely a tight-grained hardwood of some sort.  From my novice view, it looked a lot like cherry, but it could also be red gum perhaps.  


The wood was so nice, I even considered just milling all for faces and going with that look for the island.  But this would really change the overall style of the piece, and I still wanted to keep with the look and feel of the rough sawn stock, so in the end I decide against it.


Above is a pick of what a milled top might have looked like (I promise I use a real camera in my next post instead of my cell phone.) 
 
In order to glue up the leg blanks I was nervous that if I got squeeze out, I wouldn't be able to sand it off without compromising the look of the surface of the wood.  So I decided to mask off around the joint to "catch" any squeeze out.  This approach along with using TiteBond III which dries a dark brown rather than yellow seemed to work pretty good.  The stock was ~1.75" x 4" to begin, creating beefy 3.5" x 4" legs.  I'm not sure yet how I feel about that as they are a bit bigger then I was anticipating.  As they ended up being rough sawn on all 4 sides, I don't really want to mill them down any smaller. 


Here is a pic of the bottom shelf being glued up.  I only jointed the edges of the boards as the three boards were all very close in thickness and pretty square.  I wasn't so lucky with the boards for the top which I ended up jointing and planing on 3 sides. 

One of the boards in the bottom shelf has a pretty long and deep gouge in it, I'm hoping it will add to the look and feel of the island. 

Next will be cutting and attaching the apron and bottom stretchers.  I went back and forth a lot between doing mortise and tenon or dowel joinery.  I haven't done either before so i didn't really have a preference.  I'm going to go with mortise and tenon though as I know this is the more traditional and durable option.  Now I have to decide if I drill and chisel or use my router.  I'll do some experimenting and decide from there. 


Thursday, September 26, 2013

Board Selection

So the wood is dry now after the pressure washing and I set to picking out boards for the top and bottom shelves.  It was a bit tricky to find boards that were similar in color and texture and also didn't have such bad cracks and dings to make them unusable.  This is what I came up with.


 I think its going to look pretty good.  Some of the board have some pretty dark water stains which I'm not sure I like.  They might lighten up a bit with sanding, I'm going to need to experiment a bit with all of that.  After picking out the boards, I set to taking out the rest of the spikes that were still in the wood.  When I said mini-railway ties I wasn't kidding.
 

The downside of these spikes is the large holes they leave in the boards.  I like this from a character point of view, but as this island will be used as a place to eat, these holes might be a place for crumbs to collect and be hard to clean.  Three options here as I see it:

1.  Leave the holes and hope the crumbs fall straight through or use pipe cleaners if necessary to clean them and enjoy the character.
2.  Fill the holes with cut off spikes (George gave me a box of these).
3.  Fill the holes with epoxy (kind of a pricy option if I got for the "West" system which is apparently pretty good.)

We'll see, I think I can finish the top first and then decide if I want to go for option 2 or 3. 

Next step is milling, I'll be jointing the underside of the top boards and their edges and starting to put the legs together.


Tuesday, September 24, 2013

Been awhile


Well looks like I took a little break since the last post - almost a 2 year break!  I'm surprised blogging is still something people do.  Anyway, not sure if anyone is going to read this, but I'm starting a new project and thought I'd try and document it like I did for the slab coffee table.

So perhaps a little update.  Probably the main reason that I haven't been blogging is that really haven't been doing much woodworking due life being busy with young kids and the fact that we moved this past winter which resulted in a focus on basic home renovations.  (The house we purchased was built in 1908, so there is no shortage of projects to tackle!)

This project will be a kitchen island for our new/old kitchen.  After some discussion and poking around, we decided that we would like an island made out of reclaimed wood.  In fact, the island we would like is this guy from Restoration Hardware - which they call the Salvage Wood Kitchen Island Small.


A couple of problems with this.  The first is that they are asking $1500.00+ for it - yikes!  Also, looking closely at the picture I don't think this is actually reclaimed wood at all, more like "roasted" wood which is a process they use to get this look.  Also, they claim it is unfinished, and it appears to be softwood - my 2 year old son would destroy this thing in a matter of hours....

So, looks like a dead simple design - let's make this our-self out of reclaimed hardwood (assuming I can find some).  Off to Kijiji and low and behold, a fellow only 5 kms or so from my house is advertising reclaimed wood that he sourced from Kentucky.  It is said to be from a signal tower built during the American civil war no less!  I envision something like this structure which was near New Market, Va.


George from The Galt Wood Co. was a pleasure to meet and hooked me up with 80 board-feet of reclaimed either gumwood or redwood, we're not sure.  In any case it is heavy, so defnitely a hardwood of some sort, should last another 150 years with ease.  Here it is on my car:


I've never worked with reclaimed material before so I had a bunch of questions and George was kind enough to answer them all and then some.

The wood is pretty dirty and still has a lot of nails in it.  Most of the nails are more like mini railway spikes, straight from the 1800's pretty neat, but difficult to remove.  My first task was to pressure wash the materials to get rid of the surface dirt.  I tried to be careful not to over do it, as you can easily cause surface damage to the wood if you aren't careful with the pressure washer.  I'll need to wait until the stock dries to see if I was successful.

Here it is drying on my work bench.  I'll give it a few days.


By the way, that is my new/old basement which will serve as my new shop.  A lot of the shop is still in boxes and this project will be the first one in the new house and thus I suspect a lot of shop improvements will take place while I work on this.

Monday, November 21, 2011

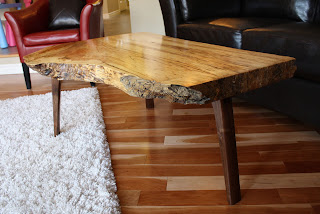
A few more pics of the table

Well,

Still don't have wax on it yet, and don't have a great place in my house to take pictures, but here are a couple of more shots of the spalted maple coffee table in likely it's final location.


Sunday, November 13, 2011

Nearly there

So the table is put together now, I'm going to let it cure for 7 days or so and then rub down the finish with 0000 steel wool and put on a coat or two of Clapham's wax (probably the salad bowl version).  I've taken a few pictures of it in the basement but the lighting is poor.  Once it is waxed up, I'll take some better ones.  I may still put a few more coat of finish on it though.  There still some spots where it just kept soaking in and it didn't build.  I'm kind of hoping the wax will help on in these areas.

Also, I ran into some issues with temperature, I applied the finish in my garage due to the fumes, but it is not insulated.  Once the temperature got below say 16 degrees (it is November in Ontario), the finish started to bead up, and not wet the surface.  Preheating the top and finish inside the house first seemed to help, but I think I might continue to have issues if gets much colder.  Maybe I'll wait until spring to put on more finish, doing it the house is not an option with Waterlox.